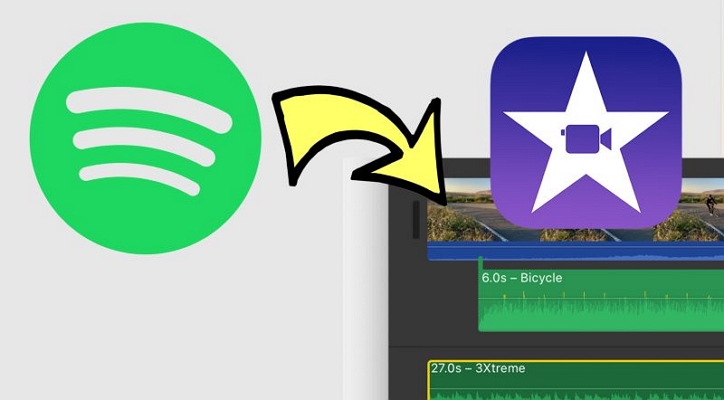
How to Add Spotify Music to iMovie
Apple’s rules around music usage in iMovie are clear: tracks need to be DRM-free. For commercial work, that level of care makes sense. For a personal one, like a family montage, a Thanksgiving video, or a memory worth keeping, it feels like overkill.
And when you try to add Spotify music to iMovie, things get tricky. However, tricky doesn’t mean impossible. In fact, there’s more than one way to make it happen, whether on an iPhone or Mac. We’ll break it all down, from the steps to use, the tools, and everything you need to know.
Preparation: Convert Spotify Music to iMovie-Supported Format
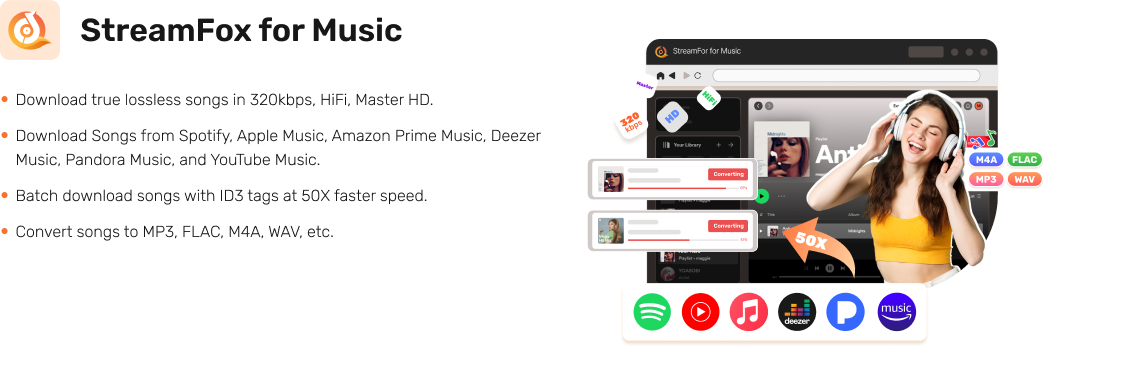
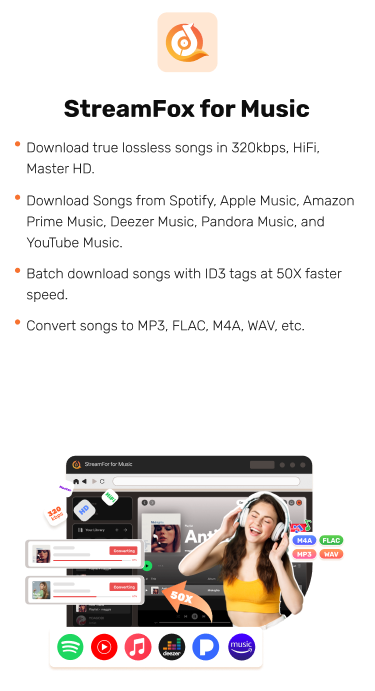
StreamFox for Music, breaks through Spotify’s DRM and lets you convert Spotify songs as standalone audio files that are ready for seamless integration with iMovie on Apple devices.
You can choose the output format that suits your projects, as StreamFox offers many iMovie-compatible formats. You can use MP3 to balance quality and space. Go for high-fidelity with WAV which is uncompressed, making it perfect for audio-heavy projects. M4A (AAC-encoded) strikes a middle ground.
Every converted song comes intact. Titles, artist names, and cover art: nothing is lost. Everything stays organized too, so you won’t spend hours searching for the right track mid-project.
StreamFox doesn’t stop there. You can convert songs in bulk or individually, it’s up to you. First you don’t need Spotify Premium. StreamFox does have its own subscription plan. But even as a free StreamFox user, the first three minutes of each track comes unlocked with the 14-day free trial. And the 14-day trial also unleashes unlimited conversions. Even after the trial ends, the converted music files remain yours to use. So, if you’re working on a quick iMovie project, this might just be all you need.
- Built-in Spotify player with drag-and-drop ease: no URLs are required for songs adding.
- ODSMRT technology: provide 320 kbps quality, even in MP3 format.
- Fully preservation: songs come free of Spotify’s shadow, perfectly syncing with Apple’s ecosystem.
- Expand your music library: support conversions from Apple Music, Deezer, Pandora, and beyond.
Convert Spotify Music to MP3 for iMovie Using StreamFox
Step 1. Download, install and launch StreamFox. Spotify stands with the other available options on the main dashboard. Click on its icon to begin.
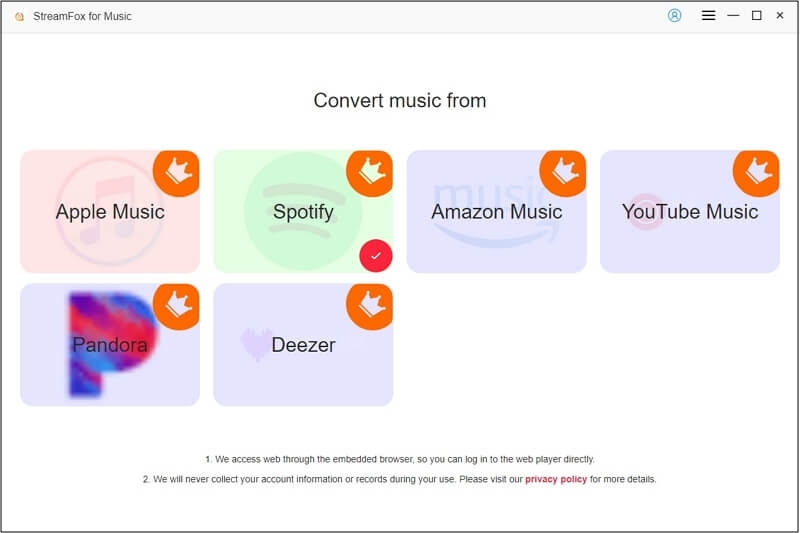
Step 2. Click Log in and enter your Spotify credentials.
Step 3. Select the desired Spotify tracks and drag them to the Add (+) icon to queue them. For larger projects, entire playlists or albums can be added similarly.
Step 4. Choose the format that suits your project best: MP3, WAV, or M4A. When all is set, hit Convert All.
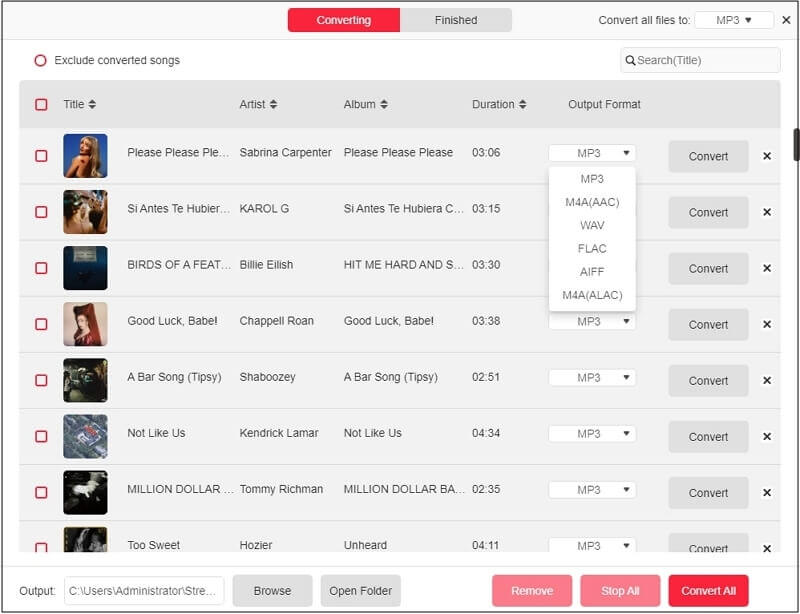
Each track, complete with metadata like titles and artist names, is saved exactly as it should be in the Downloads folder.
How to Add Spotify Music to iMovie on Mac
Spotify music on your local Mac means the hard part is done. For adding the local Spotify song to iMovie, there are multiple paths. The Import button lets you browse folders. The Audio & Video tab is different, which is useful when you have synced them to Apple Music. And there’s the drag-and-drop option, which bypasses menus altogether. Here is the simplest path forward:
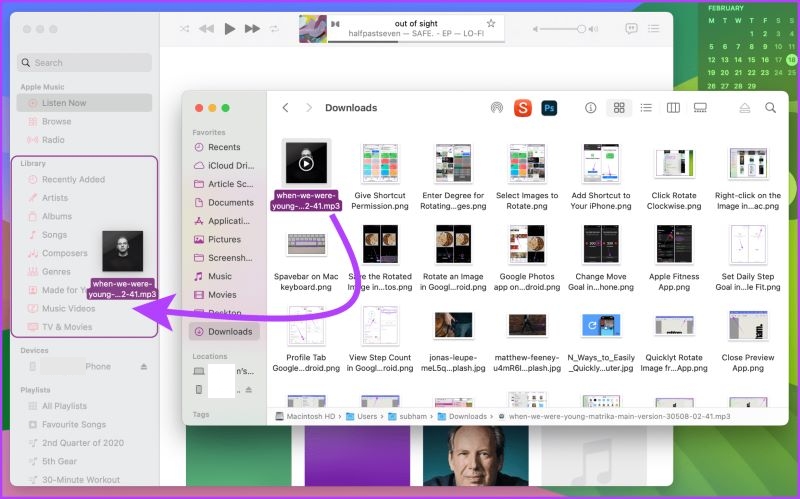
Step 1. Open the iMovie project or create a new one on your Mac and add your images or videos.
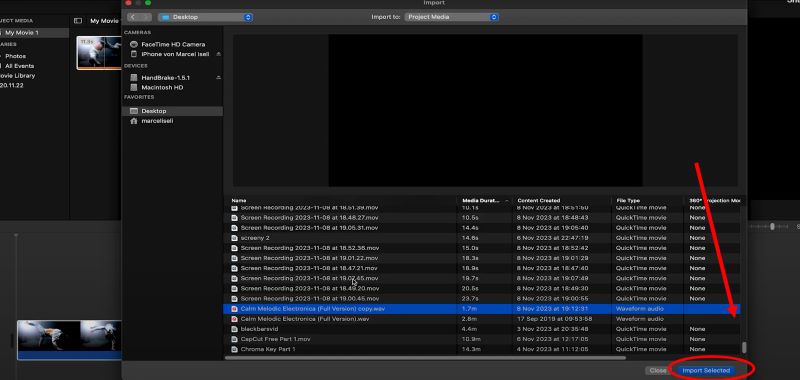
Step 2. Look at the top-left corner of the interface. Find the downward arrow icon: that’s the Import Media button. Click it.
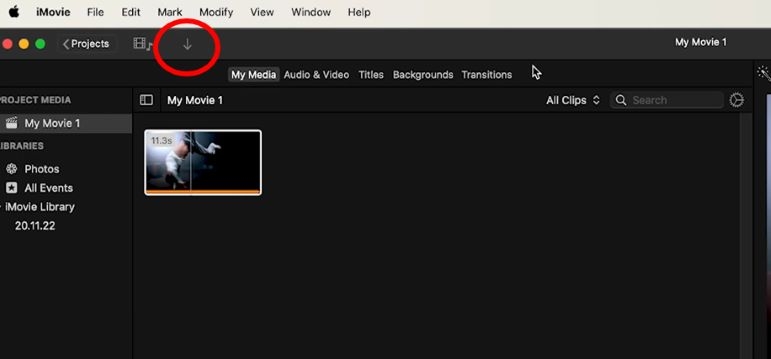
Step 2. A Finder-like window will open. Head straight to the StreamFox folder. Select one or gather multiple. Press Import Selected.
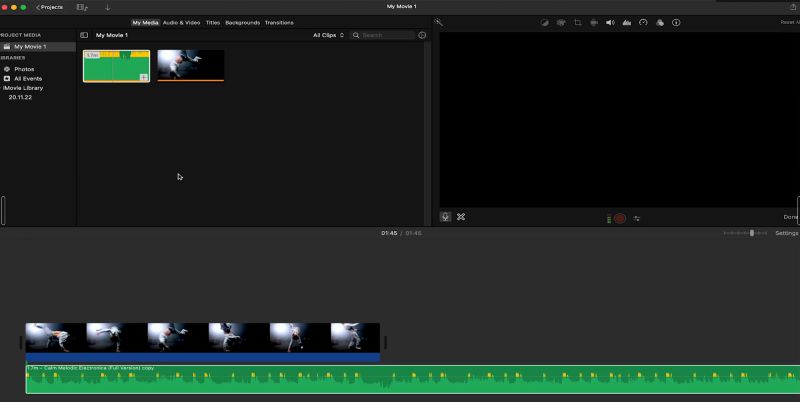
Step 4. You can see the added Spotify music in the My Media tab. Take the track: drag it directly from the media tab.
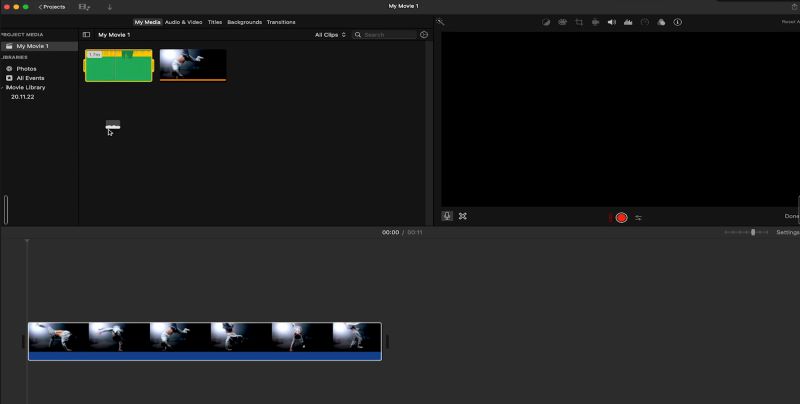
Step 5. Move it into the timeline and place it beneath your visuals. To use it as a background music: lower it further below the music note icon. That’s it!
How to Import Spotify Music to iMovie on iPhone/iPad
To use Spotify tracks converted through StreamFox on iMovie, the converted music needs to be on your iOS device first. Then, you can add Spotify music to your iMovie project. Here are 2 ways for you to complete the 2 steps and we will introduce them in this part.
Option 1. Transfer Music with iTunes/Apple Music and Add via Audio Option
At first glance, this method will feel long. But once done, everything will fall into place for future projects.
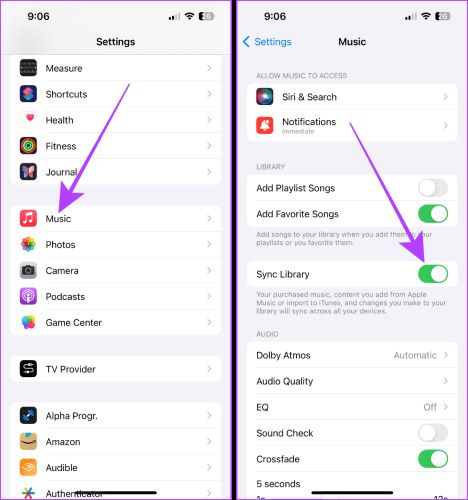
Step 1. Make sure Sync Library is enabled on your Mac (Settings > General tab) and iPhone. The added Spotify track will automatically sync when the iPhone and Mac are on the same Wi-Fi network.
Step 2. Start with Finder. Navigate to the folder where StreamFox saved your converted Spotify tracks. Now, launch the Music app and you’ll see the Library section on the left.
Step 3. Drag the tracks from the StreamFox folder over to the Library pane in Apple Music and drop them in.
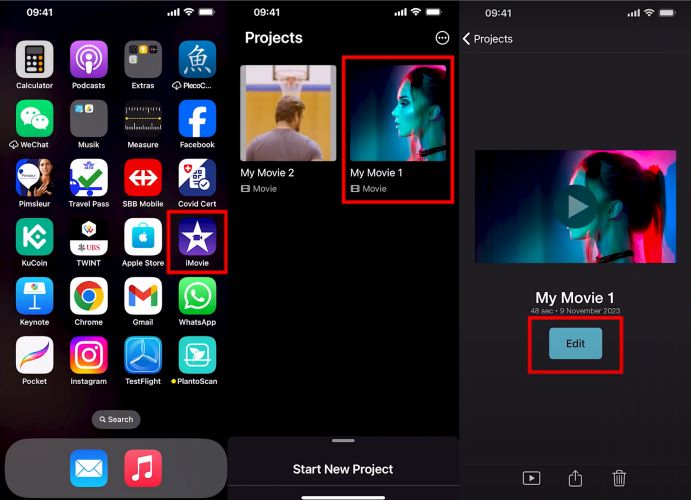
Step 4. Now coming to getting the Spotify track in your iMovie project. Step into iMovie on your iPhone and choose your project from the Projects list. A quick tap on the thumbnail, followed by Edit, and you’re inside the timeline.
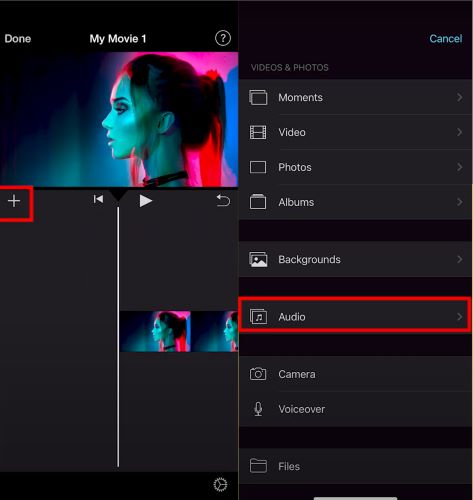
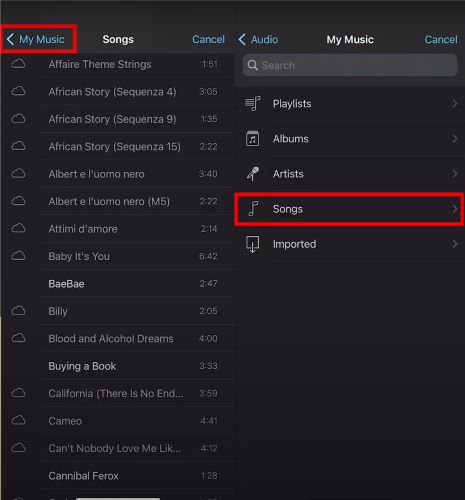
Step 5. Look below the timeline: tap the + button to bring up your media options. From the list, choose Audio.
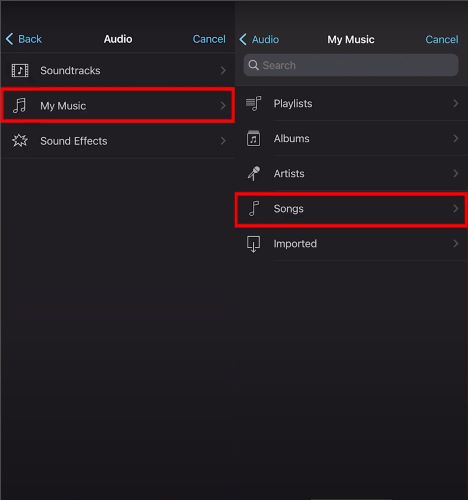
Step 6. Inside Audio, open My Music. Use Playlists, Albums, or the Songs tab to find what you need.
Step 7. Browse through the music list. The synced Spotify songs will carry a cloud icon, meaning they are not saved on your device yet. Tap the cloud icon. A prompt will say the same: tap Music to make the desired song available offline.
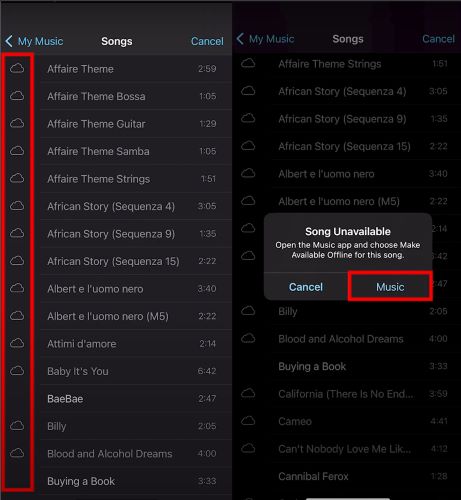
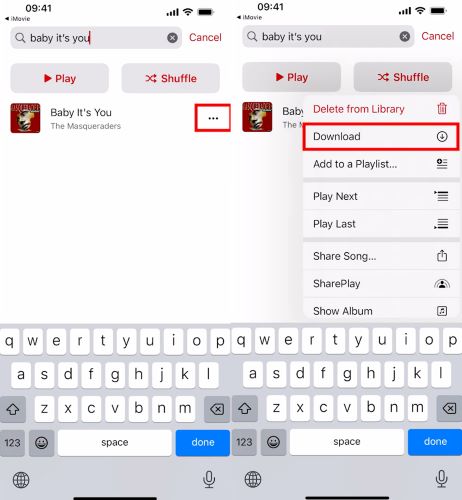
Step 8. For some reason, tapping the Music icon doesn’t take you to the exact song in your library. Find your Spotify track via search. Tap the three dots (•••) beside the song, hit Download, and let it save to your device.
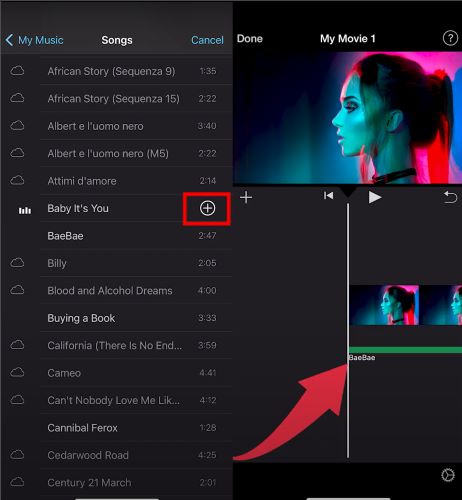
Step 9. Head back to iMovie app and refresh your Songs tab. Your track sits waiting: now free of the cloud icon.
Step 10. Tap the track once and the + button will shine beside it. Tap the plus icon and the Spotify song will slide into your timeline as a green audio layer.
Option 2. Transfer Music Using WhatsApp and Import via Files Option
WhatsApp is another useful tool to transfer Spotify songs from your computer to your iPhone. Next, we will show you the steps to complete music migration with WhatsApp and add migrated songs into iMovie projects.
Step 1. Launch WhatsApp on your computer and type in your registered number to Message yourself. Then, click the Attachment (paperclip) icon and opt for Document.
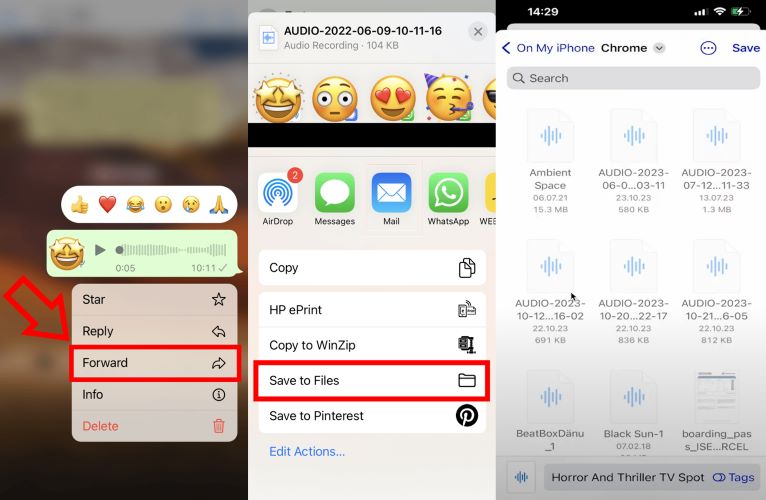
Step 2. Attach the converted Spotify track and send it. Make sure to keep the music file personal: StreamFox tracks aren’t for sharing.
Step 2. Move to your iPhone and open WhatsApp. Find the file, press and hold it until options appear, and select Forward. From the share menu, choose Save to Files. Browse a preferred location and drop the track.
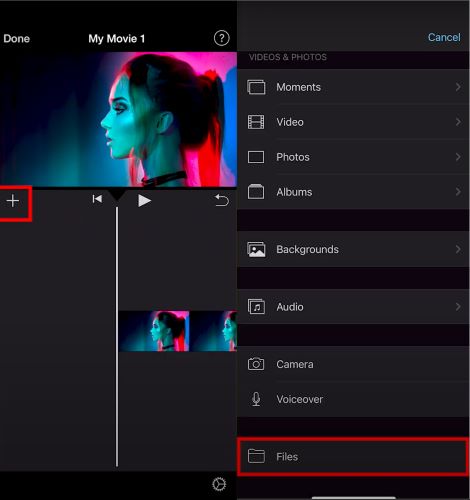
Step 3. Open iMovie on your iPhone and step into your project. Tap the + icon to access media options. Instead of Audio, head to Files.
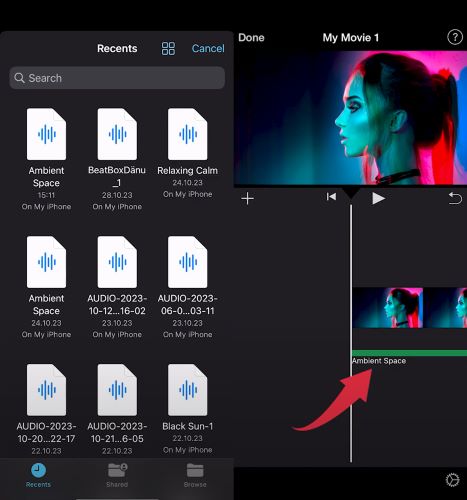
Step 4. Navigate to the folder where you saved the Spotify track. A single tap will import it and the audio will join your timeline.
How to Add Spotify Music to iMovie on Apple Devices without Conversion
If you don’t want to convert Spotify music as MP3 for adding it to your iMovie, you can choose to screen record the Spotify music and then add it. It’s a shortcut that many forget to take. The visual and the screen itself along with the music will be recorded. At the time of importing the screen recorder to iMovie, the software will give you the option to isolate the audio and discard the rest.
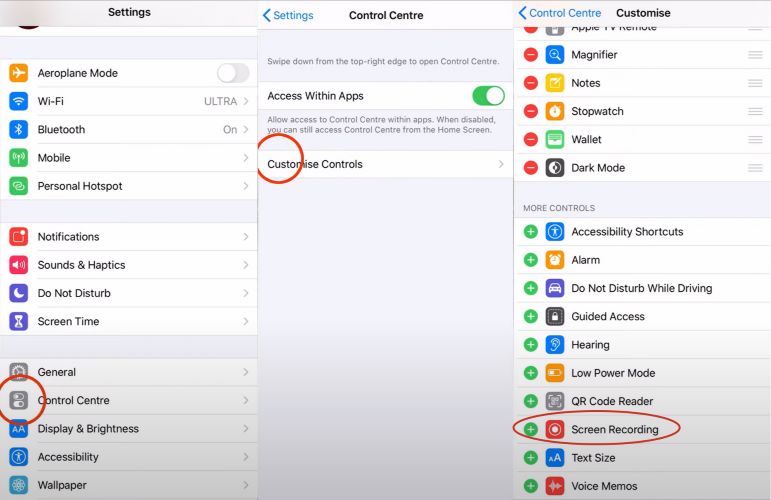
The feature isn’t obvious, which hides in your iPhone’s Control Centre. So, not everyone knows where to find it, though. Start here:
Step 1. Add Screen Recording to your Control Centre: head to Settings, open Control Centre, and tap Customise Controls. Then, scroll down, find Screen Recording, and hit the green “+” .
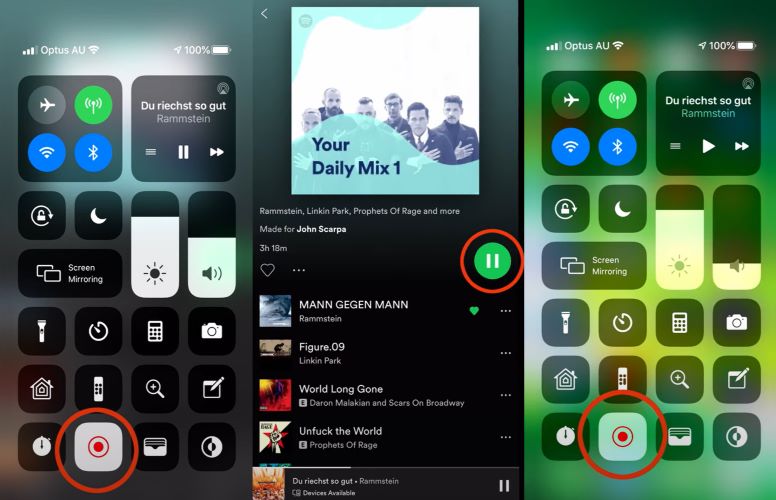
Step 2. Swipe into your Control Centre and you’ll find the Screen Record button. Tap Screen Record and it will turn red and record.
Tips: Make sure to flip on Do Not Disturb.
Step 3. Let the music play on Spotify. And when the song playback ends, tap the red timer in the corner or press the Record button again to wrap it up.
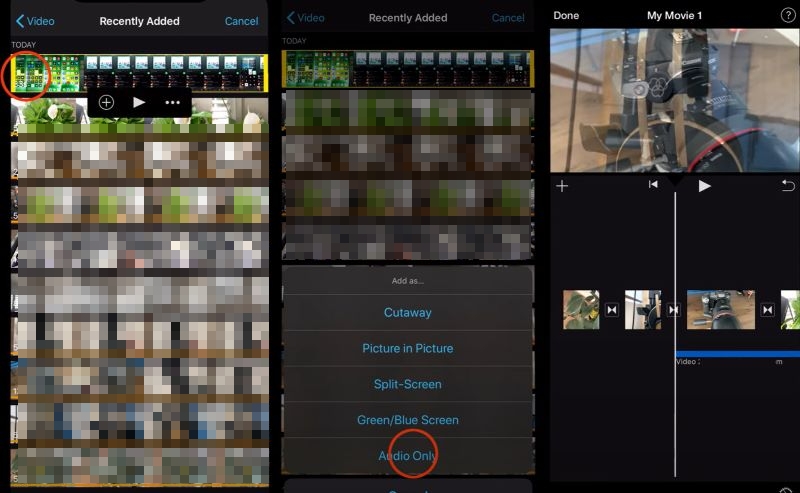
Step 4. Enter your iMovie project. Tap Add Media (+), select Video, and navigate to Recently Added. Your Spotify song recording will appear in the collection.

Step 5. Tap on your recording, select (…) and choose Audio Only. Next, the Spotify track will slip into your iMovie timeline.
Difference Between Spotify Music Conversion and Screen Recording
Both StreamFox for Music and Screen recording hit the right target: getting Spotify tracks into iMovie. They work, no doubt. But the result and the workflow: they couldn’t be more different. Here’s a snapshot:
| Feature | Spotify Music Conversion (StreamFox for Music) | Screen Recording |
|---|---|---|
| Audio Quality | Up to 320 kbps and lossless options | Compressed and variable: tied to playback settings. |
| Output Formats | Whatever you need: MP3, WAV, M4A, AAC. | Single format: video file (requires audio extraction). |
| Metadata Retention | Always intact: track names, album art, and artist info. | None: raw, untagged audio. |
| Batch Conversion | Supported: convert playlists, albums, or multiple tracks at once. | Not possible: records one track at a time. |
| File Organization | Automatically organize tracks into folders (playlists, albums, etc.). | Manual effort. Name and sort everything yourself. |
| Compatibility | Fully integrates with iMovie and other Apple environments. | Compatible but needs extra steps to convert video into audio. |
| Limitations | After 14 days, you will need a StreamFox subscription. | Time-consuming: recording is real-time and needs manual clip. |
| Best For | Polished iMovie projects. Anyone chasing perfection and saving time. | Quick fixes, casual projects, and when quality isn’t a dealbreaker. |
Conclusion
And here is how to add Spotify music to iMovie on your Apple devices. Their workflow difference is evident via the table: it’s night and day.
To convert Spotify songs to local files for adding them to your iMovie, StreamFox for Music stands out for one simple reason: it gives you uncompressed music as it should be. Audio seems like a small detail, but it’s the heartbeat of your project. And StreamFox makes sure your project doesn’t lose that charm.